ShopDreamUp AI ArtDreamUp
Deviation Actions


Suggested Deviants


Suggested Collections


You Might Like…


Featured in Groups


Description
An overview to explain how we mold and cast our mask bases.
WEAR CHEMICAL RESISTANT GLOVES, A RESPIRATOR, AND PROTECTIVE CLOTHING!
I'll say it again:
WEAR CHEMICAL RESISTANT GLOVES, A RESPIRATOR, AND PROTECTIVE CLOTHING!
DO NOT DO THIS NEAR FOOD SURFACES! DO NOT EAT OR DRINK NEAR YOUR WORK AREA! DO NOT HANDLE OR USE THESE CHEMICALS NEAR CHILDREN OR PETS!
If I see anyone else blatantly ignoring basic safety precautions, I absolutely will take this tutorial down.
PLEASE READ the whole description! It explains all the steps, lists materials used here, and links to smooth-on.com where I buy my rubbers and resins.
I WILL NOT answer any questions the answers to which are in the descriptions or can easily be answered with a visit to smooth-on's website (or even a quick google search). I will also not detail this process further.
Description of steps:
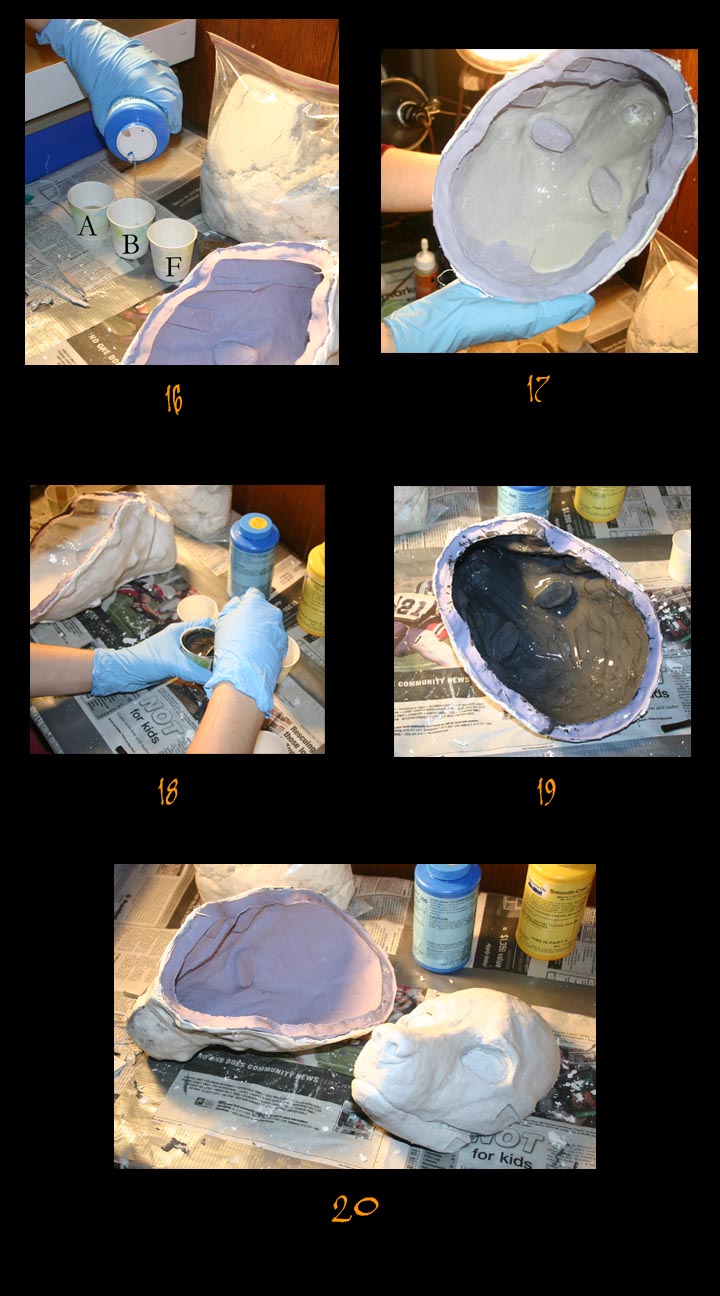
16.) Now, I cast the resin mask form. I will not be using a mold release agent for this casting, since the silicone has excellent release properties on its own. However, a latex or urethane mold would require release agent. I measure out equal parts of resin part A, part B, and Filler* (the cups are labeled in the photo).
17.) I mix the three components together thoroughly, and pour them into the mold. I "slush cast" or rotary cast the liquid resin, coating the interior of the mold in an even layer of resin. The resin begins to gel in about 2 minutes.
18.) Once layer one has set up, I mix up layer two. It has all of the same components, except that I also added a couple drops of black pigment (cosmetic preference, a dark-colored interior looks more finished to me).
19.) Layer two is applied the same as the first layer, and left to cure fully. If any places seem thin, I may apply a third layer, but it's usually not necessary.
20.) About 15 minutes later, I demold a perfect lightweight copy of the original model (this particular casting weighed in at 4.1 oz).
Part A: [link] Part B: [link]
---------------------------------------------------------------------------
* Ure-Fil III (completely optional!), a powdered filler which serves two major purposes - one, it makes this slush-casting (or sometimes brush-on) method much easier, and it also reduces the weight of the casting. Of course, it also decreases the cost of each casting by a little bit (since each casting then requires that much less resin), but that's mainly just a plus for me.
Materials used:
Smooth-cast 300 urethane resin (could also use smooth-cast 325 or ONYX) from Smooth-On
Ure-Fil III filler (Optional)
So-Strong black urethane resin pigment (Optional) (not necessary with ONYX)
Chemical-resistant nitrile gloves
paper cups and popsicle sticks (for mixing)
To learn more about the materials I'm using, and to learn more about mold making and casting basics, visit Smooth-On.com: [link]
WEAR CHEMICAL RESISTANT GLOVES, A RESPIRATOR, AND PROTECTIVE CLOTHING!
I'll say it again:
WEAR CHEMICAL RESISTANT GLOVES, A RESPIRATOR, AND PROTECTIVE CLOTHING!
DO NOT DO THIS NEAR FOOD SURFACES! DO NOT EAT OR DRINK NEAR YOUR WORK AREA! DO NOT HANDLE OR USE THESE CHEMICALS NEAR CHILDREN OR PETS!
If I see anyone else blatantly ignoring basic safety precautions, I absolutely will take this tutorial down.
PLEASE READ the whole description! It explains all the steps, lists materials used here, and links to smooth-on.com where I buy my rubbers and resins.
I WILL NOT answer any questions the answers to which are in the descriptions or can easily be answered with a visit to smooth-on's website (or even a quick google search). I will also not detail this process further.
Description of steps:
16.) Now, I cast the resin mask form. I will not be using a mold release agent for this casting, since the silicone has excellent release properties on its own. However, a latex or urethane mold would require release agent. I measure out equal parts of resin part A, part B, and Filler* (the cups are labeled in the photo).
17.) I mix the three components together thoroughly, and pour them into the mold. I "slush cast" or rotary cast the liquid resin, coating the interior of the mold in an even layer of resin. The resin begins to gel in about 2 minutes.
18.) Once layer one has set up, I mix up layer two. It has all of the same components, except that I also added a couple drops of black pigment (cosmetic preference, a dark-colored interior looks more finished to me).
19.) Layer two is applied the same as the first layer, and left to cure fully. If any places seem thin, I may apply a third layer, but it's usually not necessary.
20.) About 15 minutes later, I demold a perfect lightweight copy of the original model (this particular casting weighed in at 4.1 oz).
Part A: [link] Part B: [link]
---------------------------------------------------------------------------
* Ure-Fil III (completely optional!), a powdered filler which serves two major purposes - one, it makes this slush-casting (or sometimes brush-on) method much easier, and it also reduces the weight of the casting. Of course, it also decreases the cost of each casting by a little bit (since each casting then requires that much less resin), but that's mainly just a plus for me.
Materials used:
Smooth-cast 300 urethane resin (could also use smooth-cast 325 or ONYX) from Smooth-On
Ure-Fil III filler (Optional)
So-Strong black urethane resin pigment (Optional) (not necessary with ONYX)
Chemical-resistant nitrile gloves
paper cups and popsicle sticks (for mixing)
To learn more about the materials I'm using, and to learn more about mold making and casting basics, visit Smooth-On.com: [link]
Image size
720x1296px 150.26 KB
© 2008 - 2024 Qarrezel
Comments203
Join the community to add your comment. Already a deviant? Log In
thanks! ")